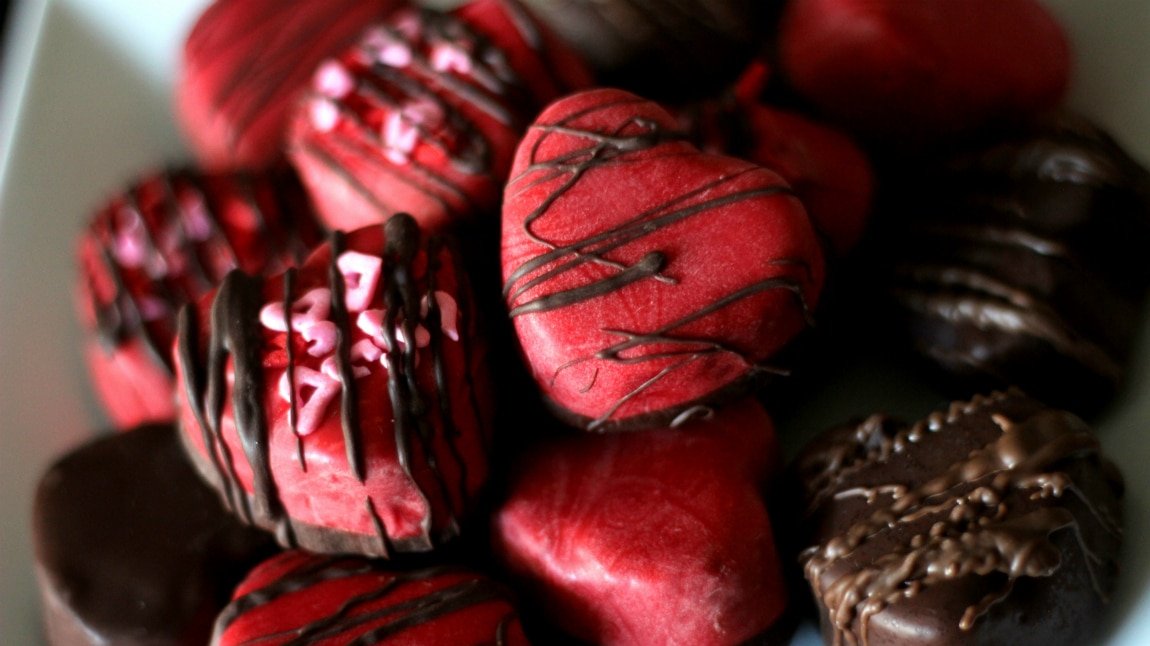
If you weren’t aware of Wilton and I being best buds, and me being on their Sweet Treat Team, then you’ve either been living under a rock or this is your first time here. Whatever the case, we’re both in for a treat! A little over a …Read More….
Heart Shaped Glasses Happy Valentine’s Day! It wouldn’t be a holiday on this blog if I didn’t cut it super close! I’ve been pretty busy and I wasn’t really planning on doing something for Valentine’s Day, but I had a pretty big reason to besides …Read More….
It’s Christmas time!! Kris my Kringles, where the heck has the year gone?!
I know, I’m pretty bad with this blog thing during the holidays. So many great blogs out there with so many holiday posts coming out of their yule logs. Christmas cookies, pies, all that jazz, just overflowing the internet. It’s so great to see.
Sadly, I can hardly find the time to get in the kitchen to do anything these days. I mean, our outside decorations were just put up today! You’d think being a stay-at-home dad would give me some time to whip something up or get stuff done around here. Turns out tending and picking up after 2 of Santa’s little stalkers takes up a good amount of time and brain power.
But here I am! I may not have time to do things I wanted to do, like this awesome free class from Creativebug featuring The Wilton Method: Gingerbread House and Cookies. But I had time to put this bark together. It’s so insanely simple, it’s silly.
Now, you know me. I’ve become quite the Candy Melt aficionado around these parts. Heck, I was told from inside sources that I’m referred to as the Candy Melt King of Chicago! Of course, not to be confused with the Abe Froman, the Sausage King of Chicago. Which embarrassingly enough, has happened before.
They’re such a great and simple ingredient, and so versatile as you’ve noticed from what I’ve done. This time though, there’s no baking, effort, or even experience required! Like I said, it’s silly how easy this is.
With so many possibilities you can make with this mold, I chose this one because of an old experience. I remember a few years ago, we were in a store after Christmas and were doing what everyone else does in stores after Christmas – walking down the clearance aisle. There, we found white chocolate covered pretzels with sprinkled candy cane bits. Intrigued, we tried them out and obviously missed the label on the bag that advertised they were laced with crack. We just couldn’t stop eating them and wanted to buy more but it was the last one! Ever since then, the combination has really stood out for me.
And here I am shedding light on it for you! With an ingredient list as complex as a candy cane, this is as easy as Christmas treats get.
You’re going to need the Wilton Christmas Stack-N-Melt Candy Bark Mold. Which let me just say, is a great addition to your kitchen during the holidays. Especially if you’re the cookie exchange/basket giving type. This mold is simple but can make so many different types of holiday themed barks, it’s worth the investment, trust me.
You want to fill up the mold pretty good with at least 25-30 candy melts in each square. If you put less, the bark won’t come out as thick.
You can use one bag, sure. And it’ll come out great. But as a preference I like a bark to be a little thicker. So if you only have one bag of candy melts then all is good.
I tried this once before the official batch and found something out: I don’t know if it’s my microwave or what, but when I put it in the center, it took longer for the candy melts in the middle to melt. I had to microwave it at least double the amount and they still weren’t melted. I thought it was insanely weird and/or that bag of candy melts was possessed by the Ghost of Christmas Past. But the next time I tried, I put the mold at an angle, as if… as if it were a train, and the rotating plate in the microwave was its track… Geeze, do I have to paint the picture for you?! Anyway, everything melted perfectly like that.
Does that mean my microwave sucks? Or that I’m crazy for my analogies? Or both?
If you can’t find the Candy Cane Candy Melts, first off, I’m so sorry, they’re great. Second, don’t fret! There are tons of flavor combinations you can make with this. But I’ll get into it more later.
For now, let’s get our candy melt on!
Take your mold and just pour the candy melts in there. Go ahead, don’t be shy.
Spread them out evenly between the four compartments. You can get your House Elf to help you with this if it’s too tedious.
Once they’re even and well layered, which is something you want to make sure of, open up another bag and carefully top off each one.
You want to get a good amount in there for a nice, thick bark. If you’d rather have it thinner then by all means. It looks like a lot but it’ll melt down nicely. Again, it’ll probably be about half the second bag. If you must, shuffle it around and make sure there are none taking up more space than they should. Channel that annoying guy at Disney telling you to take up all the available space in front of you in the line, even though you’re purposely leaving plenty of space because the group in front of you doesn’t believe in deodorant. Ugh. Too many times, I can’t even count…
Next, put the train on the trac… I mean, the mold in the microwave and go 2 minutes and 30 seconds at 50% power. When you take them out, they should look like this.
Not completely melted, but you can see underneath they’re beginning to give. At this point, I went another 2 minutes at 50%.
Take them out and you should be golden. Get a spoon or a small offset spatula and smooth them out, making sure they’re completely melted. Don’t be afraid to pick them up a few inches and let them bang on the counter once or twice just to even them out.
Now time to top them. Get your pretzels and crush them in your hands a bit. Sprinkle them on and get a good even layer. Next, hit your candy canes with a tenderizer or whatever’s handy and get them down to small bits. Sprinkle them on top of the pretzels .
When you’re done, give everything a gentle pat just to make sure everything is touching the melted candy melts. You don’t want to push down too hard though. You’ll get pretzels poking out of the beautifully imprinted letters the mold is going to create.
In the cooler they go for a couple of hours. When you’re ready to take them out, the best way to do it is by, one at a time, separating the sides of each compartment, while pushing up from the bottom. There’s going to be a little give, but they should be able to pop out without a hitch.
Once they’re all out…
Victory!
Like I said. So freaking easy it’s scary. They’re absolutely fantastic for a holiday party or a cookie basket.
And remember what I said earlier, they’re amazingly versatile. I mean, you don’t have to use candy melts. Or pretzels. Or candy canes.
Just doing these inspired to make a few different ones for when I’m making my holiday stuff…
A few ideas:
Chocolate with candy cane and pretzels
Chocolate with salted caramel
Chocolate with caramel and pecans (not pe-khans. Pe-CANS. That’s right, I said it.)
Chocolate with crushed graham crackers and marshmallows
Chocolate with BACON. My god, I wish I had bacon in the freezer right now… Merry freaking Christmas and God bless us all Tiny Tim.
You should get the point by now. The list goes on and on with what you can do with this awesomely festive mold. And don’t even get me started on flavoring the chocolate because that’ll open up a whole new can of tinsel. My bottle of coffee liqueur calls my name every time I open the pantry..
Basically, what I’m trying to say, is this little mold can make you a downright superstar. Only regret will be that you didn’t buy 2!
This Is Halloween Halloween! Seven hells, it’s already Halloween.. Do you remember last Halloween? I do. Like it was yesterday! But we mustn’t complain about how time is flying or we’ll find ourselves in 2015 before we finish the rant. Instead, let’s talk Halloween! Who …Read More….
Hellooooooooooooooooooooooooooooo! I haven’t seen you guys since National S’mores Day! That was like 3 weeks ago right? I’m terrible at math, let me see how ma… whoa! That was almost 2 months ago!? How’s it going! What’s happenin’!? How’s the weather?? Ok, fine, I’ll cut …Read More….
You know me, I don’t usually do these food holiday things due to my lack of coordination and planning. But hey, it’s not like I was busy doing anything else here, right?
Now, this was originally going to be my only post for the #WiltonSweetTreatTeam since I had made the icing with some marshmallow candy melts. Because come on, candy melts deserve the love. But as you may have read in the last post, I received a pretty sweet mailer from Wilton and I just had to use the shot glass molds. So I figured, why not? I’ll post two s’mores recipes!
I know, I know. The whole food blogosphere seems to be posting something about s’mores, but I couldn’t help it. I mean, is there anything really wrong with that? They’re s’mores! You can never get enough of them. Speaking of not getting enough, these rolls may not look as amazing/spectacular/jaw dropping as Beth’s Fire Pit S’mores Cake from Hungry Happenings, but they are pretty freaking addicting if I do say so myself.
S’mores are one of those treats that are so iconic, they actually deserve their own special day (unlike random holidays like National Vichyssoise Day [November 18th if you’re curious]). The absolute perfect combination of melting chocolate, gooey marshmallow and a crunchy graham cracker is possibly one of the best combinations ever put together by man (I’m a fan, can you tell?).
Of course, leave it to the Girl Scouts to make such a crack-like treat. The first recorded recipe dates back to 1927. But it wasn’t officially referred to as a s’more until 1973 when it’s addictive qualities were acknowledged and gave inspiration to the name. But even before that, the Girl Scouts have recipes in various publications decades before 1973 where they call it a s’more. And it makes sense when you think about it.. With names like Tagalongs, Samoas, and Do-Si-Dos, the name S’more, or “Some Mores” as they were first referred to, totally sound like something the Girl Scouts would have made up. I could even picture it plastered on a brown box and sold for $20 or whatever the drug dealer price for their cookies are right now. Whatever the case, they deserve whatever recognition they get because everything about the s’more from the name to the taste to the feeling of euphoria they give you fits perfectly with its name.
So now that we know why s’mores are so addicting, let’s get started with putting these bad boys together.
If there is one food I love in this world more than pizza, it’s a good cinnamon roll. With that said, I shock myself when I say I’ve only made them once. It was this past Christmas and its success pretty much guaranteed that I’ll be making them for every Christmas from now on.
I love using Instant Dry Yeast. Works the same as regular yeast and you don’t have to worry about proofing it. Just add it straight into the dry ingredients and you’re good. Don’t even have to worry about salt, it’s great!
You’re going to need about 1 1/2 packages of graham crackers.
I tend to always forget to buy buttermilk but luckily I seem to always have lemon juice for some insanely odd reason. While I know it’s not the same, it’s a fairly good replacement in a pinch. Just a teaspoon or so of lemon juice in a cup of milk and let it sit for a few minutes.
I threw the grahams in a food processor but it didn’t make a difference compared to just crushing them by hand. So if you want to save yourself from washing something else, just break out the mallet or rolling pin and go to town (kids love that job).
In my excitement to get everything rolled up I totally forgot to throw in chunks of Hershey’s chocolate like I was originally going to do. It’s alright though because they’re fine just the way they are.
As the name indicates, it’s best to plan ahead and make these the day before you want them. Leaving them alone overnight will ensure the dough is well rested and all the flavors will mend.
To proof your dough, you can put the bowl on top of a recently used toaster oven, on top of the refrigerator, or like I did, on top of my dryer since I was coincidentally doing laundry at the time.
When you need to proof again just before baking, if your oven doesn’t have a Proof feature, Alton’s way of doing it is perfect: In a cold oven, put a baking pan on the lower rack and fill it up halfway with boiling water. Then in the center rack put the buns out of the fridge. Once risen, take everything out of the oven and preheat it.
Alright. Bloggingbots, let’s roll out!
First off, crush up your graham crackers like I mentioned. Either food processor or by hand. You’re looking to get it as fine as you can. Once it is, mix it with the flour.
To get the dough started, get your mixer fitted with the whisk attachment. Then take your egg yolks, egg, sugar, melted butter and buttermilk and whisk them up for a bit. Next add about 2 cups of the flour with the salt and the yeast and mix it up some more. Once it’s incorporated, change the whisk out for Captain Hook’s hook (what we call it in our kitchen), and throw in the rest of the flour. When it’s all together and the dough forms give it a feel. It should feel soft and moist. If it’s too sticky you’ll have to add some more flour. Once it gets to where you want it, knead it in the mixer for about 5 minutes or until the dough clears the side of the bowl while mixing.
At that point, plop it onto your floured work surface and knead it for a little more till you feel it nice and elastic-y.
When it’s ready form it into a ball and put it into a bowl. Rub the top of the dough with oil so it doesn’t dry out, find somewhere a little warm, cover it and let it double in volume for about 2 – 2 1/2 hours. This is where doing the laundry while making the dough comes in handy!
Sometime while it’s rising, go ahead and mix your filling stuff. Just take everything – brown sugar, cocoa, graham crackers, melted butter, and salt – and mix it all together. And for Pete’s sake, don’t sit there with a spoon and eat it.
When the dough has risen, butter or spray a 9×13 glass baking pan, and get your floured work surface ready again. Roll out the dough into a rectangular shape. You’re looking for a size of 18 x 12 inches, with the longer side close to you. Get a ruler and try and be precise if you can because you’ll only have enough filling for that size. If you roll bigger than that then you’ll have some edges that aren’t covered with goodness.
Once it’s rolled out, brush on some melted butter leaving about 1/2 inch on top. And then sprinkle the filling on while also leaving the 1/2 inch on top. Smooth it out and then gently press the filling into the dough. Once it’s in there, get your marshmallows and spread them around covering everywhere there’s filling.
When you’re ready, take the edge closer to you and start rolling it. Roll it tightly as you go, and when you get to the end, pinch the dry 1/2 inch strip to the roll to seal it. Make sure the roll is nice and even then with a serrated knife cut it in half. Then cut those halves in half, and so on until you wind up with 12 rolls.
Now, if something went wrong and your roll is shorter for some reason, don’t go trying to get 12 rolls out of it. Use your better judgement! The rolls should be about an 1 1/2 thick.
Arrange the rolls on the greased baking sheet and wrap them up for at least 16 hours. Or, *slaps forehead*overnight.
Alright, rise and shine! Make sure you brush your teeth and do whatever else you normally do before you run to the kitchen and finish these up.
You’ll notice they rose in the fridge. Time to get them to rise some more! Take them out and turn on the proof feature on your oven. Or, put them on top of your toaster oven, or whatever it is you do. I’ve even turned on my oven to the lowest it’ll go, and once it reached that temp I turned it off and put the pan in there. It works! Whatever the case, put them in for about 30 minutes. You’ll know they’re ready when they look nice and puffy.
…Alright, not that Puffy…
Take them out of the oven and preheat it to 350. Once it’s ready, slide them in for about 25-30 minutes. Or until they look like this:
While they’re cooling, get the icing ready. What I did was put the candy melts in a glass bowl with the milk and microwaved it on 50% power for 45 seconds. Stir it around and go a little more if it needs it until it looks smooth enough to spread.
When the rolls have cooled slightly, pour on the icing and spread away.
Once that’s done, so are you. And so are the rolls because they are freaking good. Seriously, they’ll never see it coming.
Have I said addicting? I did right? If I didn’t, then listen… They’re addicting. That pool of chocolatey grahamy goodness on the bottom.. pure happiness. My wife said they’re better than regular cinnamon rolls. And that’s like, almost blasphemous to my ears, so they have to be good.
Happy National S’mores Day!! I had original plans to celebrate this day, but thanks to a surprise mailer full of fall goodness from Wilton (Pumpkin Spice Candy Melts!), I decided to put in the extra effort and do something else. And if you know anything …Read More….
Boom There are no words that can truly express the pure and utter joy I currently have. Not because we won the lotto or anything trivial like that. But because I can finally post these brownies.Let me tell you the story that led to this …Read More….
I cannot believe it’s been 4 years since our lives changed. In a way it feels like it should be decades longer, but at the same time it feels like only yesterday Seb came strolling in.
This kid is growing up insanely fast and it’s apparent in everything he does. From the things he says, the things he does, and the way he thinks – it all shocks the heck out of both of us. I guess we still expect him to be a kid that’s just doing his thing, but we totally forget he’s a sponge soaking everything and anything in. He has wants and needs, dreams and desires, all wrapped up with an imagination that’ll baffle any adult mind. Even though we have 2 kids, and we learned a lot from raising him so far, there is still at least one point in every day when he reminds me that I have absolutely no idea what I’m doing. And those are kinda the moments I look forward to.
It’s those moments that make me slow down because otherwise the years are becoming nothing but a blur. I remember when he was into and wouldn’t stop watching Thomas the Train and Chuggington. He’ll still watch those types of shows, but now, as of today, he’s into a wider variety of stuff. I know that’s partly or maybe even mostly my fault – introducing him to so many cool things that stuff in his age range can’t compete with – but I can’t help it. I honestly and truly feel bad about it. If I sit and think about it too long it’s actually something that pains me. I feel as if I’m robbing him of being an innocent boy because I’m being the influence that drives him to more adult stuff. But at the same time, I think of how much he enjoys the stuff he enjoys and how it excites him and makes him smile. As long as he’s happy, right? There’s a pleasant way to look at it without having it eat me up from the inside. But still, every time I see a kiddie show he used to watch I always feel like that’s what he should be into. Instead he knows things like Ant Man’s super power, or the difference between a regular battle droid and a super battle droid, or what a Dalek is… What kind of a 4 year old knows what a freaking Dalek is?!
A cool one, that’s what kind!
Anyway, here’s a little rundown of what’s going on with his likes.
He’s still into Star Wars – actually more than last year. I’ve been holding out on him, waiting to sit down and watch the 2 trilogies. My wife asked when will I do it and I said “when he’s ready” (queue the eyeroll). But I think the time is coming so it’ll happen soon.
Anything to do with Marvel Superheroes with his favorites being Spider-Man and most of the bad guys. Him and the bad guys, let me tell ya. I’ve been thinking about getting him some started on some comics. I think he’ll enjoy reading them together. It’s something I never got into as a kid so it’ll be a fun adventure for both of us.
He’s always ready to play a video game, whether it be a Lego game or Disney Infinity or Skylanders now (his birthday gift). And he’s shockingly good for just turning 4. He’ll pick something up, dive in, figure out controls, and start exploring fairly quickly. It’s amazing to watch sometimes, like he’s some sort of prodigy. *wipes that dirt of my shoulder*
He really, really likes Legos. he helps me build them and likes how you can break them when you’re playing and easily rebuild. Admittingly, I never got into Legos as a kid, I was more of the action figure type. I wanted to try and get him to appreciate them more than I did because he could learn a lot from building and using his imagination.
The #1 show right now is Sheriff Callie’s Wild West. Holy crap. There’s got to be some sort of subliminal messaging going on there, like crack for the eyes or something, because no matter what he’s doing, if you turn that on, he will stop in his tracks and sit quietly for 22 minutes. Best. Show. Ever.
He loves to play outside. Bubbles, riding in his car, hitting the tee ball, playgrounds, just randomly running around in circles – anything. If he’s outside, he’s happy. Sucks we don’t have a fence though because he’s always in his mindless play-rage mode and isn’t the best listener when it comes to commands like “stop”, “come here”, or “don’t play with that snake.” He doesn’t even respond to threats of the Goblin King coming to get him like he used to. We need to find a new fear, David Bowie just isn’t cutting it anymore.
He loves playing with our dog, Anikin (yes, my dog is named Anikin). And Anikin loves playing with him. We were worried that Ani wouldn’t play nice but they’ve been doing good together. He just turned 7 and I dread the day his age catches up with him 🙁
He could be a real dorkchop sometimes. Like, he’ll walk into a wall and tell you to watch where you’re going. It’s hilarious stuff that makes us facepalm while laughing. It’s so great.
There’s plenty of other stuff he currently loves that I won’t bore you with. It wasn’t too long ago we thought he’d never be potty trained or he’d never sleep in his own bed. Now, he’s growing into this kid we’re immensely proud of; who loves his brother, makes us laugh, embraces his geekiness that was handed down to him, and just enjoys life every waking second of his day. It’s amazing, this having a kid thing. Just amazing.
The Cake
If you remember, last year I made a WALL-E themed cake. It’s a movie he was really into, watched it every day. Every.. day. And he always asked for a WALL-E toy when we went to the store but unfortunately it wasn’t on shelves anymore. So to eBay I went; where I purchased one (legit as far as I could tell) from China where they apparently still have plethoras available. I decided to make it the centerpiece of a cake and he loved it. I loved it too because I didn’t have to spend a lot of time on it since it was basically supposed to resemble a pile of garbage. Freaking score.
This year though was a little different. This year was a toss up between something to do with superheroes, Legos or Disney Infinity. And it was really close to being the latter because he is a Disney Infinity freak. I was thinking about making a cake in the shape of the Infinity base and putting Phineas and Agent P on there since they’re one of the two sets he doesn’t have. But no, he decided he wanted to have a Lego cake. So I figured, why not Lego and superheroes..
Ever since I got my PS4 in November, this kid has been insanely into Lego Marvel Superheroes. I swear he knows more about the universe than me at this point. He quickly figured out how to turn the game on, load the save, and just start playing. If I let him he would stay there all day exploring with every character, learning their names, picking favorites until he found a new favorite, and so on. Speaking of favorites, for some reason, no matter how much we try to change his mind, he just loves the bad guys. He always wants to be the bad guy, always wants to play as one or pretend he’s one. Anyone else’s kid prefer Loki over Thor? Let me know so I could stop worrying about him trying to take over the world when he grows up!
Oh wait, he likes to pretend he’s the Hulk sometimes. For a while he went around the house yelling “HULK SMASH!” as he jumped up and pounded the floor.. or the wall.. or the dinner table while we were eating.. My wife always gave me this look and I swore every time I had absolutely no idea where he picked it up from but she never believed me. It got to the point where we had to tell him the Lego Marvel game broke and he has to play something else (oh, don’t act like you’ve never done that!). At least we got to platinum it first. I feel bad. Maybe I’ll tell him we fixed it one day.
Anyway, back to the cake.
It was an easy idea which came to me fairly quickly. I knew my mom was sending over a few Lego sets he was really wanting, one of which was a set with Doctor Octopus and Spider-Man. And like I said, this kid loves bad guys, with Doctor Octopus, Loki, and Magneto topping that list.
So I knew I was going to make a Lego brick as the cake. I really wanted to do a crazy looking one with the bricks underneath the fondant as if it’s being constructed, but that is waaaaay beyond my expertise. Heck, this one is pushing my decorating prowess. I thought the cake being a brick would be an easy way to go and I knew I was going to have Doc Octopus crawling around on it. It wasn’t until I got the set the night before that I noticed it came with some sticks of dynamite. As soon as I saw that I knew Doc Ock was going to be causing some havoc with Spider-Man trying to save the day.
I know it was far, far from perfect. Honestly, the only reason I shared it was because you can look at it and know what it is – I wasn’t even expecting that! Nonetheless, while there were some messy parts when it came to the fondant and the level of the cake, I’m still fairly happy with how it came out.
As a Wilton Sweet Treat Team member, I feel as if I have this power with many looking to me for guidance of some sort. And as a great man once said, with great power, comes great responsibility. So I’d like to consider this cake as kind of an inspiration for those afraid to work with fondant. I know there are many of you out there who are afraid to attempt this way of decorating. But seriously, if I could do it, you could do it. The whole process from making it to applying it is.. well, it’s a piece of cake.
The Fondant
Now, believe it or not, this is the first time I made fondant.
Ok, I’m lying. This is the second time. But that actual first time didn’t count. Seriously, forget I ever mentioned it.
So yeah, this is the first time I made fondant and it came out pretty damn good.
I know fondant has a really bum rap. Just like a fellow gamer/blogger friend of mine The Noyse pointed out here on his Lightning McQueen birthday cake, a lot of people hear the word fondant and instantly get turned off to the idea of having cake. If that sounds like you, then the odds are you’ve never had marshmallow fondant.
Marshmallow fondant works just like regular fondant, only it’s good, sweet, and edible. Really edible. My mom has been making cakes for a long, long time. And whenever someone requests fondant, that is the type she makes. When I asked her for tips and the recipe she uses, I wasn’t surprised to find out it’s the same recipe as my good friends at Wilton.
It’s really simple. A pound of marshmallows, about 3-5 tablespoons of water, 8ish cups of powdered sugar, and a slab shortening to coat your hardware to make sure nothing sticks. You’re working with melted marshmallows after all, and that stuff can stick a cinder block to the ceiling.
If you’ve never made it before don’t be intimidated. It’s exactly like making a dough. You coat a microwavable bowl with shortening along with your spatula, pour in the marshmallows, and microwave in 30 second intervals till it’s melted. …Ok, fine. You don’t usually use a pound of marshmallows in your dough, but you know what I mean.
If you’re coloring it, it’s best to add the coloring to the melted marshmallow (once again, I can’t stress the awesomeness of Wilton Icing Colors – remember, add by the toothpick!) before incorporating the sugar. If you’re making one batch and it’s going to be more than one color, then you’ll have to add the color after the sugar is added, usually during the kneading process is best.
Also, try to remember when attempting to match a color of something, to go a little brighter than the target. You’ll be adding a lot of powdered sugar so it’ll dull the color a tad.
Add the sugar and mix it around with a shortening coated spatula till it’s incorporated and looks like dough. It may get a little tough towards the end so be ready to get your hands dirty.
From here you’ll definitely need to get your hands dirty. I recommend shortening on your bare or gloved hands, and if it’s still really sticky, best rub some shortening on the work surface too. Start to knead it on a surface covered with powdered sugar (and shortening if needed) until the fondant forms.
You’ll want to continue kneading until it’s smooth and elastic. You’ll know it’s right when you can pull on it and it stretches without tearing. If you pull and it tears then it still needs work. If it seems like it’s dry then too much powdered sugar was probably incorporated so just add a little more water. Again, you’ll know what you’re looking for.
Not quite…
There you go.
When you’re done, form it into a ball, double wrap it and put it in a freezer bag. You do not want it drying out. If you think forming into balls is overrated, logs are in this year.
Wrap it up and put it in the chill box overnight to let it rest. It could actually stay in there, wrapped up nice, for a couple of weeks.
When you need it (haha, knead it..), take it out, and on a powdered sugar surface again, roll it out to about 1/8th inch thick. As far as applying it to the cake, you’ll need to put a crumb coating on it – a thin amount of buttercream to act as a glue for the fondant. Roll out as much as you need and roll it onto your cake. Rub it and smooth it out so it’s on there good. Cut the extra that’s hanging off and boom, you’re a fondanteer.
Haha, fondanteer.
The way I made the Lego brick was I layered a cake, covered it with fondant, and on top of that I glued down – with buttercream – some circles I cut out of an extra cake I made. Tricky part to that was finding something the right size to cut the circles with. Wound up using a lid to a baby bottle. Just call me MacGyver. I then covered those circles with fondant and tried my best to seal them to the top of the cake to make it look like one piece.
As you can see, I failed miserably.
Now if I would do it again, I’d try my luck at covering the cake and the circles in one sheet of fondant. But who knows if that would work better. Well, I guess professional fondanteers would know. It probably would’ve looked a lot better.
The Cake – Let’s just put it in the same box as my first attempt at fondant… See, if you’ve forgotten, the wife and I are still trying to lose weight and eat better. I tried to find a happy middle ground and make a Weight Watchers yellow cake. And I’m so glad I did because it taught me that I should never ever ever try to make a Weight Watchers yellow cake again. Well, at least not that recipe. So What I’m saying is if you’re ever going to make a Lego cake, use your favorite cake recipe.
The Buttercream – since I needed something for the fondant to stick to the cake and couldn’t go to the store for an alternative – I had to make my regular, go-to chocolate buttercream. Which is pretty awesome. But absolutely horrible when you’re on a diet.
Also, if I ever do it again, I would not use a dark buttercream with a light colored fondant. See! We’re all learning here! I told you this was my first time… It’s easy to see the dark buttercream underneath the light colored fondant. Especially after it’s been sitting on a table for a few hours. Some things you just have to learn the hard way.
I made peace with the fact that I was going to scrape off the fondant and buttercream and only eat the weight watchers cake. But since that was the greatest disappointment in the history of cake baking, it was easy to just take one bite and throw the whole cake away after Seb went to bed.
Actually, no, it wasn’t easy… But in a way, omg, it was a cinch, that cake was horrendous.
I did all of the cake assembly – the layering, the buttercream, the fondant – on a Wilton Cake Lifter so I could easily slide the cake onto it’s serving plate without dirtying it up in the constructing process. Worked like a freaking charm.
Once it was all done, I picked my least favorite corner and cut it out let Doctor Octopus blow it up. It’s a good thing Spider-Man was there to stop him from blowing up the rest of it (I totally would’ve let him). I know, I’m a child.
Like the shamrocks I made, I wasn’t able to get to work on this till the night before. So I was up till 1 in the morning rolling fondant and playing with Lego’s. Good times. You know what though? Being able to show Seb the cake when he woke up and hearing say how awesome it is was worth it all. I even caught him going to look at it a few times throughout the day. I know all he wanted was to play with Doctor Octopus, but still..
Happy Birthday, my boy. May you enjoy endless more.