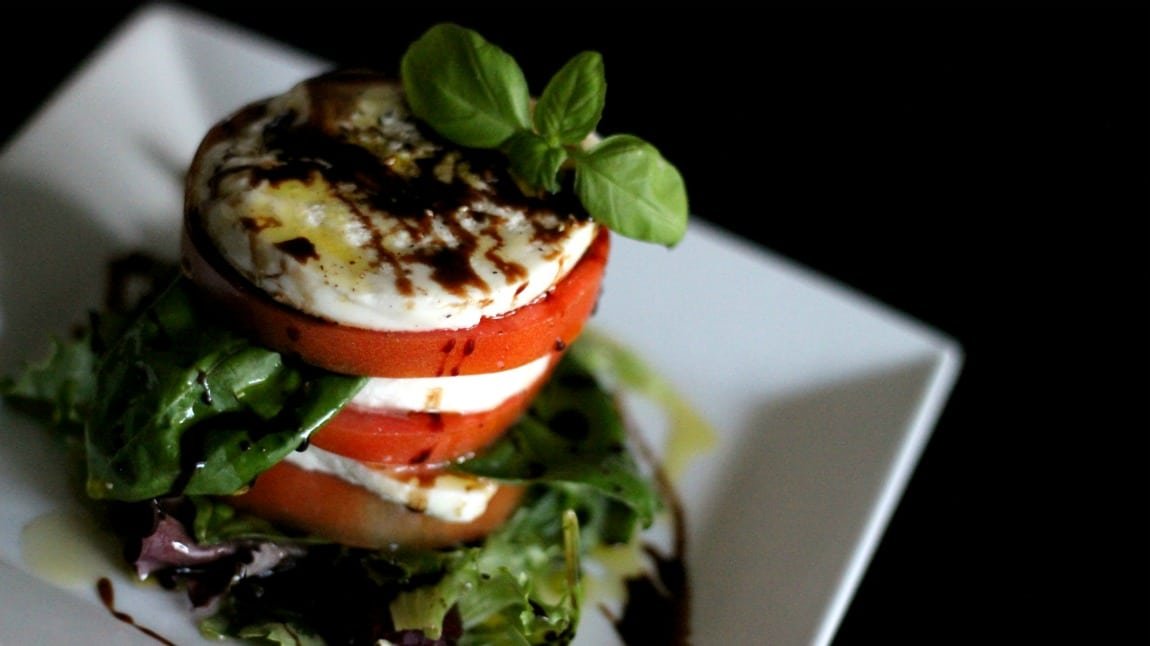
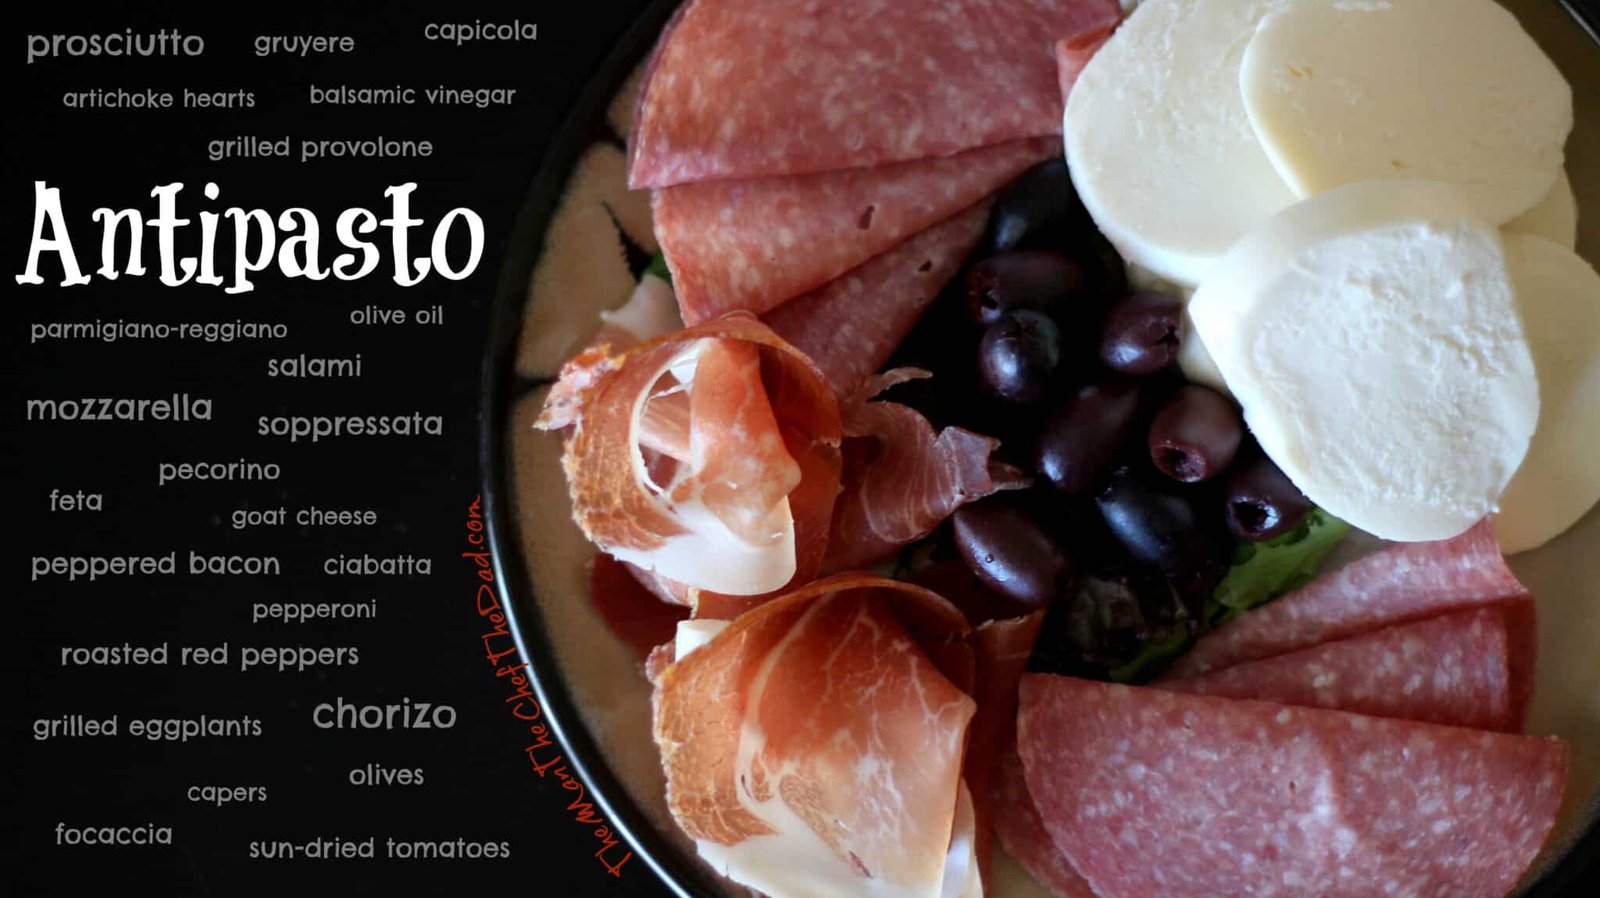
Tag: cheese

Simple Antipasto

Simple Antipasto

  Before I get into the unbelievably easy “recipe” that is a simple antipasto, let me spin you a tale. Once upon a time, in a mystical, unforgivably hot, far away land – that you may know as Florida – lived my wife and I. …Read More….

Balsamic Reduction (on a Caprese Salad)

Balsamic Reduction (on a Caprese Salad)

Alright, I hope everyone is ready for the best salad that has ever been created! Caprese Salad with a Balsamic Reduction is easily the simplest, tastiest, most addicting salad that you’ll probably ever try. Oh man, I sincerely hope you’ve had this before. If you …Read More….

The Wife’s Sunday Dinners: Baked Macaroni and Cheese

The Wife’s Sunday Dinners: Baked Macaroni and Cheese


Dark Horse

Update 10/26/19: So the mad scientist that the wife is, improved her recipe! After countless experimentations, and even more cursing and swearing, she has found the perfect balance of cheeses and creams and macaroni. Seriously, just thinking about it is making my mouth water for her cheesy goodness. Check out the new ratios below! And in the new format, with a recipe box right up front and center! Take that, you food blog haters! What are you going to complain about NOW, huh?!

Baked Macaroni and Cheese

The wife created a shrine of pasta and encircled herself in toasted breadcrumbs so she can channel her inner southern charm and create an irresistibly cheesy and delicious baked mac and cheese. I'd say selling her soul to the comfort food gods was worth it!
Author: Mrs. Los
Cost: Priceless

Ingredients

  • 1 each Macaroni Elbows 16 oz box
  • 4 Tablespoons Corn Starch
  • 1 teaspoon Salt
  • 1/4 teaspoon Pepper
  • 3 cups Whole Milk
  • 3 cups Heavy Cream
  • 4 Tablespoons Butter the real stuff
  • 5 cups Sargento Mild Cheddar finely shredded
  • 1 cup Sargento Sharp Cheddar finely shredded
  • 8 oz Kraft Mild Cheddar block, cubed
  • to taste Salt

Topping

  • 1 cup Sargento Mild Cheddar finely shredded
  • 2/3 cup Breadcrumbs italian seasoned
  • 1/2 cup Parmesan Cheese grated (optional)

Instructions

  • Turn on the oven to 375 and get the salted water boiling. Throw the pasta in there and cook for 6 minutes. Once it’s done, drain it as best you can and put it in a fairly big bowl. Preferably one that can double for a Halloween candy bowl. Ok, fine, just kidding.
  • In a heavy bottomed pot, put the corn starch, salt, and pepper. Turn up the heat to medium, medium-high heat, and pour in the milk and cream while stirring constantly. Like, constantly. See the post below.
  • Stir until everything is incorporated. Once it is, add the butter and keep stirring till it’s melted. Then, keep stirring till the mixture starts to boil. Once it does, let it boil for one minute (while still stirring) and then take it off the heat.
  • Go ahead and put all the shredded and cubed cheese (whatever isn't set aside for the topping) in the milk mixture and stir it around until all the cheese is melted. It won’t be perfectly smooth, and that’s ok.
  • Pour the cheese mixture into the bowl with the macaroni, and give it a really good stir until all the cheese is in there.
  • At this point, you want to taste it. She always give me this pleasure because I’m “so damn picky and can never have enough stupid salt”. Ahhh, it's like she knows me. Anyway, taste and salt. Don't be shy. You want it to be addictive like you NEED more before your head explodes from anticipation. If you're not getting that feeling, then it's too bland.
  • After you taste it, add salt, and taste it again, you’ll be ready to pan it up. So get your pan (or pans) and spray with non-stick. Pour the heavenly river of cheesy goodness in and marvel in its glory.
  • Top with the rest of the shredded cheese. And if you’re doing parmesan and breadcrumbs (which you reeeeeeally need to do), Mix them together, and then sprinkle them on top as well. Or just do it separate, who cares!
  • After that, it’s ready for the oven. So put it in for 25 minutes and do the hardest part of the whole recipe. Waiting.
  • If it’s not browned good, turn on the broiler for a minute or two till it is. DON'T WALK AWAY. The broiler is NOT your friend. It will turn on you faster than your best friend in high school with that girl that you liked.

Notes

  • Notice the name brand cheeses. No, we're not being fancy pants. Like I said, wife tried numerous times to get the recipe right, and of all the different cheeses she's tried, these turned out the best tasting, and least amount of oil from the cheese.
  • I love the parmesan and breadcrumbs on top. She adds a fraction of what I would add because “the kids don’t like it”, but I think the breadcrumbs make the topping. So it’s up to you.
  • You want to use mild cheddar as the main cheese, but don’t be afraid to use different ones in there also. Actually, yeah, be afraid. You might totally mess it up! But don't let that scare you, go ahead and be adventurous. For instance, in a batch before, she used mild, sharp, parmesan, and pepper jack. So if you have a few open bags of shredded cheeses in your fridge then now is the perfect time to put them to use. If you daaaaaaare.
  • This is a great dish right out of the oven. If you cut it up right away it’ll be melting everywhere and won’t hold it’s shape. But if you wait for a few hours after baking, or the next day even better, then it’ll hold a great shape thanks to all the cold cheese. It’s easy to reheat and will be amazing for a few days after.
  • The shape it holds makes it perfect for fried mac & cheese if you’re into that sort of thing.
  • Which you freaking should be. My goodness, fried mac & cheese? C’mon..
  • This recipe can make a nice, thick, 9×13 sized baking dish of mac & cheese. If you’d like, you can totally split it into 2 9×13 baking dishes. You know, Thanksgiving is coming up so that’ll be a good option for that.

I hope you guys are ready because this is a post yeeeeeears in the making. Ever since I started the blog I’ve been trying my hardest to get permission to do this recipe. And after countless hours of drilling and persuading, I finally got the rights from the creator to go for it.

Yes, my wife is finally letting me post her Baked Macaroni and Cheese recipe!

What?! What do you mean what’s so special about mac & cheese? Are you high?! This is about as comforting as comfort food gets! And it’s easily my favorite dish from my wife’s repertoire.

Little known fact: Before my wife, I never had baked mac & cheese. No, before you start questioning my childhood, I wasn’t deprived… I was Hispanic. Rice, beans, plátanos, yucca and avocados graced our tables. I’m not complaining, trust me. But still, my eyes weren’t open to new worlds till she opened them. And she wonders why I love her so.

Sadly though, she doesn’t make it nearly as often as I would like. “It wouldn’t be special if I made it all the time”, she’d say. And I’d always counter with “I know, it’ll be even MORE special!”

She never buys my reasoning though, so I’m forced to wait countless months between every preparation. As if macaroni elbows are only in season 4 times a freaking year.

On top of that, every time it is made I beg and plead to let me document her making it so I can put it on the blog. “No, it’s my recipe, not yours. I’m not going to have you steal it like you did my Biscuits & Gravy recipe.”

For the record, I have no idea what’s she’s talking about.

But! Something happened this time. Something clicked in her head and she didn’t stop me when I proclaimed “I’m going to get my camera!” Nope, she went along with it. And on top of that, she even cooperated and told me the measurements! I totally thought my luck ended with being able to take pictures and I was going to have to guess everything else.

IMG_6253

I had a lot of fun just sitting back and taking pictures, as you’ll probably notice from the photographic evidence in the post. Kinda makes me wish she had a blog and I just took the pictures and wrote stuff. A huge thing I’m thankful for is she made this on one of the brightest days since fall started. And I love me natural light so the shots came out great.

IMG_6335

The catch though was she wasn’t waiting for me. Through the whole thing she probably warned me twice on what she was about to do to get ready on either side of her. Despite her rushing trying to do stuff before I set up the shot and general disapproval, I know deep down she enjoyed it too. Those dirty looks and mumbled curses she gave – every time I told her to “do that again!” or “pick up a good handful of cheese and drop it from this height…[click-click] yeeeess! [click] ohhh yeeeah, right there!… Now do another handful just in case..” – were all out of love and fun for the project.

And because every good recipe has a back story, she told me this one’s:

Nothing crazy like the recipe was found behind a picture frame in an basement, but she has been having this mac & cheese since she was young. Her mom used to make it for her and she always looked forward to it. And get this, she only made it twice a year. Twice. A. YEAR! That’s borderline child abuse. I guess macaroni elbows were even more scarce than they are nowadays.

So above, you will find the comfort food of comfort foods, my favorite dish next to pizza, and something that I always look forward to. Is it the best ever? Maybe. Is it worth this hype? You bet your ass.

Since the recipe is above and all the info is there, that doesn’t mean I’m going to let all these glorious pictures go to waste! Below are the original instructions with the pictures to help you visualize. 

  • Off the bat, oven to 375 and get the salted water boiling. Throw the pasta in there and cook for 6 minutes. Once it’s done, drain it as best you can and put it in a fairly big bowl. Preferably one that can double for a Halloween candy bowl. Ok, fine, just kidding.
  • In a heavy bottomed pot, put the corn starch, salt, and pepper. Turn up the heat to medium, medium-high heat, and take your insane amount of milk and pour it in while stirring constantly.

IMG_6238

And I mean constantly. This is one step that she’s serious about because it was the bane of many batches of mac & cheese that we had to sacrifice to the Comfort Food Gods. She is adamant about sitting there and stirring, stirring, stirring. If you don’t then the corn starch will not incorporate properly and will wind up sticking to the bottom of the pan and it will burn. Which brings me to another of her warnings: When stirring, don’t scrape the bottom of the pan. Just in case your constant vigilance and stirring isn’t enough and you wind up getting some corn starch burning on the bottom, if you scratch it and break it up, your entire batch of mac & cheese will taste burnt. TRUST me when I say it will be one of the saddest days of your life if that were to happen.

So just do us all a favor and stir, stir, stir, just don’t scrape the bottom.

  • Anyway, stir until everything is incorporated. Once it is, add the butter and keep stirring till it’s melted. Then, keep stirring till the mixture starts to boil. Once it does, let it boil for one minute (while still stirring) and then take it off the heat.

IMG_6367

After that, it’s time to bring in the tower of power. That huge bowl of orangy goodness that you’ve been staring at since you started. 

IMG_6381

  • Go ahead and put all the cheese that isn’t part of the toppings in and stir it around until all the cheese is melted. It won’t be perfectly smooth, so that’s ok.

IMG_6429

  • Pour the cheese mixture into the bowl with the macaroni, and give it a really good stir until all the cheese is in there.

IMG_6545

  • At this point, you want to taste it. She always give me this pleasure because I’m “so damn picky and can never have enough stupid salt”. Ahhh, I love when she thinks about me like that.

IMG_6607

  • After you taste it, add salt, and taste it again, you’ll be ready to pan it up. So get your pan (or pans) and spray with non-stick. Pour the heavenly river of cheesy goodness in and marvel in its glory.

IMG_6734

  • Top it with the rest of the shredded cheddar for the topping

IMG_6781

  • if you’re doing parmesan and breadcrumbs (which you reeeeeeally need to do), Mix them together and then sprinkle them on top as well. Or just do it separate, who cares!

IMG_6799 IMG_6807

  • After that, it’s ready for the oven. So put it in for 25 minutes and do the hardest part of the whole recipe.

IMG_6852

Wait.

IMG_6886

  • If it’s not browned good, turn on the broiler for a minute or two till it is.

When it comes out, have tissues ready to wipe the tears of joy from your eyes. Now remember, you can dig in, but I’d say its best to wait till it settles and it’s not a pool of melty, runny cheese. Whatever you choose to do, just get a plate and enjoy the roni out of it.

IMG_7159

And that’s that. It’s seriously simple and utterly amazing. Magical. Devine. Should I go on? Because I could.

IMG_7164
May or may not be my portion..

I’m so happy to be able to post this here. It really is one of my favorite things ever, and to be able to do it like this – a recipe of my wife’s, her cooking it and me just taking pictures – was insanely fun and a great memory to share with her. I cannot wait to do it again soon, even though she’d probably be ok with never having me take 600 some odd pictures over her shoulder while she’s trying to cook dinner. She has a good handful of stuff she makes that I love, but she refuses to regularly cook. Says stupid stuff like she’s intimidated by my background. Pfft! Maybe she’ll do more stuff now, we’ll see.

IMG_7285

Until next time! Adios.

Chicken, Cheese & Bacon Casserole

Chicken, Cheese & Bacon Casserole

First off, allow me to apologize. When I ventured into making this meal I had no idea where I was going with it. I didn’t know how I was going to plate it nor did I know how it was going to taste. Because I …Read More….

Cinco de Quesadilla

Cinco de Quesadilla

  It’s Cinco de Mayo time in the food blogosphere so I figured why not throw my contribution in the hat too? I am Hispanic after all, and it would give me a good opportunity to show off my latin flare. …. Haha, Ok, that …Read More….

Pumpkin Spiced Mini Doughnut Muffin Hole Thingies

Pumpkin Spiced Mini Doughnut Muffin Hole Thingies

IMG_5369

So it would seem as if every food blog you go to has these little balls of goodness. Even saw them on TV the other day being sold in a bakery somewhere. The popularity of them is both attracting and discouraging. I don’t really want to be like other blogs out there, but at the same time, man these things are addicting. So easy to make and easy to eat. I swear you’ll have like 2 or 3 balls in your mouth before you finish swallowing the first.

…Sorry, I’m laughing so hard at myself right now…

Anyway, what are these things? Muffins? Doughnut holes? Well, I think it depends. I did them a few ways and one way, I’d definitely call them doughnut holes, but in the other they’re closer to muffins. But for arguments sake, I’ll just refer to them as doughnut holes from now on.

No… Muffins.

Okay, doughnut holes..

Ugh, whatever.


Pumpkin Spiced Mini Doughnut Muffin Holes
:
(adapted from everywhere on the freaking blogosphere)


Batter
:

              1 3/4 cup ~ Flour
       2 teaspoons ~ Baking Powder
     1/2 teaspoon ~ Salt
  1 1/4 teaspoon ~ Pumpkin Pie Spice
     3/4 teaspoon ~ Cinnamon
      1/2 teaspoon ~ Nutmeg, Freshly Grated
                 1/3 cup ~ Canola Oil
                 1/2 cup ~ Brown Sugar
                   1 each ~ Egg
 1 1/2 teaspoons ~ Vanilla Extract
                      1 cup ~ Pumpkin Puree, canned
                  1/2 cup ~ Milk


For Doughnut Holes
:

                1/4 cup ~ Butter, unsalted, melted
       1/3 – 1/2 cup ~ Sugar
  1 1/2 teaspoons ~ Cinnamon
      3/4 teaspoon ~ Pumpkin Pie Spice
       1/8 teaspoon ~ Nutmeg, Freshly Grated


For Mini Muffins
:

              4 ounces ~ Cream Cheese, room temperature
                         1/2 ~ egg, beaten
                     1 cup ~ Powdered Sugar
            1 teaspoon ~ Vanilla Extract


Notes
:

  • As you can see, I split the recipe. So basically, these are two different products. You don’t have to make both, it’s perfectly okay to make one and not the other without hurting my feelings too much. The sugared version is what tastes like doughnut holes and the cream cheese mixture makes it more of a muffin.
  • Yes, muffin. You’ll be using your muffin pans again.
  • The doughnut holes are freaking great, but thanks to the way the sugar is applied, they won’t keep well for more than a day or two. They’ll be fine for eating, but they’ll just be soggy and not as visually appealing, so it might be best if you make them the day of if they’re for a get together or something. You can make the muffins ahead of time and then apply the sugar when you’re going to have them.
  • If you’re just making this for yourself then who cares what they look like or how soggy they are?! You’re still going to stuff your face with them, and don’t act like you’re not. I know what you do when no one is watching.
  • I know half an egg sounds dumb, but you don’t need the whole thing.
  • The cream cheese on the muffins is more tangy than sweet. It’s not there to overpower the muffin, it’s more of a compliment and another layer of flavor. Just so you know.

Let’s get some holes up in here:

  • Turn on your oven to 325 and spray your mini muffin pan with some cooking spray.
  • For the batter, take the flour, baking powder, salt, and spices and mix them together in one bowl. Take another bowl and add the oil, brown sugar, egg, extract, pumpkin puree and milk, and whisk that till it’s smooth. Once it’s smooth, add the dry mix to the wet mix and whisk till it’s combined and happy.

IMG_5342

That’s it, the batter is done. If you’re only making the doughnut holes and you’re not making the muffins, skip the next step.

  • For the muffins, take the room temperature cream cheese and…. seriously? You didn’t leave out the cream cheese again? I’m literally facepalming right now. I guess I can’t be too hard on you, as you can tell by my pic below, my cream cheese is a little runny and it’s probably because it’s been nuked. Take the room temperature or more than likely microwave softened cream cheese and add the egg, powdered sugar and vanilla, and mix till combined.Set aside.

Ok, break’s over, you can stop skipping steps now.

  • For the main event, take the batter and spoon it into the muffin pan. I went up about 3/4 of the way and was alright. If you’re making muffins: top off batter with the cream cheese mixture. You don’t need a lot, just enough to cover the batter. Once done, put it in the oven for about 13-15 minutes, until a toothpick comes out clean. When they’re done, pop them out and set them to cool on a cooling rack.

8uj777777

At this point, the cream cheese topped muffins are done. So enjoy those. If you’re feeling really crazy, you can convert them into doughnut holes, but I personally like the tangy cheesy aspect to the spice in the muffin with no sweetness involved.

But if you’re not into tangy cheesy stuff and need something sweet, let’s get the doughnut hole party ready:

  • Get two small bowls. In one bowl, add the butter and melt it completely. In the other bowl, add the sugar and spices and mix till well combined.

Now, I hope you’re ready to get Paula Deen crazy…

  • Once the muffins are cooled, take a few and dunk them in the melted butter. Oooooooooooh yeah, ya’ll. When they’re nice and coated with butter, roll them around in the sugar. When they’re nice and coated in the sugar, try not to freaking eat them all.

IMG_5357

And there you go. You’ve just made quite the addicting dessert, perfect for a brisk fall day. And in case you’re wondering, these go absolutely perfect with your pumpkin spiced latte.

IMG_5370

Mmmm… Pumpkin spiced latte….

C.R.E.A.M. Cheese

C.R.E.A.M. Cheese

The clever cat eats cheese and breathes down rat holes with baited breath.                             ~W.C. Fields If you’re wondering why the title is phrased like that, then you need more Wu-Tang in …Read More….