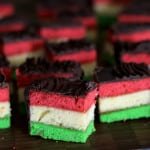
Italian Tricolor Rainbow Cookies
These were a staple growing up in New York City. They were one of the top 3 treats you would grab if you went into any Italian bakery. Tricolor cookies were and still are amazing but they're also confusing. I mean... Are they a cake or are they a cookie? The answer is yes.
Servings 35 roughly
Equipment
- Jelly Roll pan (Jelly Roll the dessert, not the awesome singer)
Ingredients
- 2 1/2 sticks - Butter softened
- 8 ounces - Almond Paste
- 1 cup - Sugar
- 4 each - Eggs large, separated
- 2 cups - Flour
- 1/2 teaspoon - Salt
- 2 tablespoons - Sugar
- 1 each - Apricot or Raspberry Jam 15 ounce jar
- 1 pound - Bittersweet Chocolate Chips
- Green, Red, and maybe Yellow Food Coloring
Instructions
For the cookies
- Get your oven to 350. Spray your pan just in case because you can never be too careful, and get your parchment lined in the pan. Be prepared!
- Get your almond paste and sugar in your mixer. Let it soften so it's easier to work with.
- Put it on medium for a few minutes until the mixture looks like fine crumbs.
- Take your softened butter and cut it up so you could incorporate it a few pieces at a time.
- separate the eggs and keep the whites on the side for a sec. Beat in the egg yolks one at a time until it's smooth.
- Get a nice piece of parchment and sift your 2 cups of flour onto it. On top of the sifted flour, throw in the salt, and then add it to the egg mixture until it's just combined.
- Now, whisk up your egg whites until they're nice and foamy. About halfway through add 2 tablespoons of sugar and continue to whisk until you get firm peaks.
- Take about a third of your whipped egg whites and fold them in to the batter. Once it's incorporated, fold the rest of it in. You're looking for a fluffy batter when you're done.
Color the batches and bake
- Get yourself 2 clean bowls and separate the batter evenly into the 3 bowls. Go ahead and leave the one third in the mixing bowl alone. We'll only color the 2 separate thirds that are in the new bowls.
- put the food coloring into each batter, mix it up, and you'll get your green and your red. If your batter is for a regular colored cake, don't color the third color. Leave it natural for the white layer.
- Get your pans, and fill all edges and sides, and make sure that the top is smooth.
- Bake each cake for about 10 minutes, if they start to brown at the edges they're done. Let them cool before you continue on.
Assemble and cool
- Take the green or red layer and spoon some jam on top of it. Smooth it out and get a nice layer on it, leaving a bit of space on the edges.
- slide the uncolored layer onto the jam spread. Then smooth some more jam on top the same way and place the next layer on top of that. In the end you should have a nice looking sandwich
- Get the whole thing wrapped up nice in some plastic wrap, and sandwich it between 2 pans.
- With the cake between the pans, you want to weigh it down with something heavy. Be sure to make it balanced though if you're not using just one thing. Once it's sandwiched nice, get it in the fridge for at least 5 hours, or just leave it there overnight like I did.
To finish next day
- After the time needed. I'll say that again. AFTER the time NEEDED.... Get your cake out and unwrapped. get it on your cutting board and slightly trim all four sides enough so it's a straight square (or rectangle) when you're done.
- Spray a cooling rack with a spritz of oil. Or if you the type to have coconut oil on hand or even a tiny amount of butter. Just enough to have a light coating so nothing sticks. Also, put a sheet of parchment underneath it the entire rack. Put your cake on top of the rack and marvel in its glory.
- toss the chocolate chips into a glass bowl and microwave it for about 40 second intervals on 50% power until they melt.
- Now. Cake is on a cooling rack, parchment underneath, chocolate melted... there's only one thing left to do. Pour your chocolate all over your cake. See the original post for tips on why it is not good to listen to LL Cool J when doing this step.
- SMOOTH OUT the chocolate AS IT'S melted. Make sure you get all the edges and sides, leaving no cake visible. Get a nice and smooth layer of chocolate on there QUICKLY. And don't listen to LL Cool J when doing it. I'm not crazy, go see the post.
- When it's still fairly melted but almost set, get yourself a fork drag it across the top. You're free to do whatever you like here as it's for presentation. You could do swirls, circles, straight lines, wavy lines, whatever. Just do it before the chocolate sets or you'll just have a smooth chocolate surface.
- after a few minutes, it should be hardened. If you tap it and it doesn't sound like it should be the opening shot of a viral IG reel, get the tray in the fridge for like 20 minutes.
- When it's hardened, go ahead and plop your cake on the cutting board again. This may be harder with the full sized jelly roll pan, but at this point you could cut the cake in half and transport it to the cutting board like that.
- Now we slice! Use a serrated knife. If you don't know where it is, I'm pretty sure I SAW it in your knife drawer. GET IT?! Saw... because it's a serrated knife.. ok, sorry. ANYWAY.
- You want to cut it into strips. This is a narrow cookie, as I'm sure you've seen them. So be sure to not cut them the size of a cake slice. Maybe half an inch thick. Again, this post is blessed with many pictures and gifs, be sure to check them out below!
- Once you have the strips, I found it easier to lay them down and slice the actual cookies down to size this way. See pictures below for a visual.
- After that, you're done! This seems like a lot but I was just being dumb in these instructions and making sure things were clear. Enjoy!
Notes
- The recipe calls for a 9x12 jelly roll pan...
- Unfortunately, I was ready to use a 15x10 jelly roll pan, totally forgetting about adjusting the recipe. So, at the very last possible minute, I changed the pan I was going to use.
- For this batch I wound up using a 9x9 square pan. They came out fine, but the layers are a tad thicker than what they should have been, making the cookie taller than how I remember them.
- So if you have a 15x10 jelly roll pan, I'd say you'll be safe doubling the recipe.
- In my 9x9 pan, I was able to turn out 20ish cookies. The 15x10 jelly roll pan would easily get you 40+, which is why I recommend going with the bigger pan and doubling the recipe. You'll get a lot more cookies for your time you're putting into them.
- Basically what I'm really saying is you don't NEED a special pan. Just do you, I'm sure it'll work out.
- Last thing about the dumb pans, promise.. If you have more than one pan, awesome, it'll go quicker for you. If not, you're like me, and will have to do each layer one at a time. My advice is don't skip out on lining the pan with parchment. I did it the same way you would do brownies. Easy to pull the layers out and just insert more parchment for the next layer.
- These are generally referred to as Italian Tricolor Cookies. But they may also be called Rainbow Cookies, Neapolitan Cookies, Italian Flag Cookies, or Seven Layer Cookies.
- Why they're a cookie and not a cake? Beats the jam outta me. If you know, school me in the comments!
- Recipes I found called for apricot jam, but my mom vividly recalls seeing the seeds of a raspberry jam between the layers of the cookie. Either jam tastes excellent so it's up to you.
- I used the Wilton Color Right Performance System for the colors. You should look into it if it's still available. If not, gel food coloring is great.
