Hard Candy
This is the recipe for hard candy, which, funnily enough, is not that hard. Well, unless you consider the possibility of getting third degree burns from the forbidden lava a difficult task. I used it for decorative purposes, but you can totally create small candies or lollipops from this.
Servings 1 tray
Equipment
- Candy Thermometer See notes below
- Silicone Mat
Ingredients
Cake
- 1 box Whatever your preferred cake is (just not yellow) mine rhymes with Teddy Bocker
- Food coloring
Hard Candy
- 2 cups - granulated white sugar
- 2/3 cup - light corn syrup
- 3/4 cup - water
- 4 or 5 drops of Blue from the Wilton Color Right System
- optional flavoring of choice see notes
Instructions
- You start by putting the sugar, corn syrup, and water in a pan, and giving it a good stir. Once it's incorporated, hook up your candy thermometer and make sure it's not in direct contact with the bottom of the pan. Throw it on high heat. You need it to go quick because you're making candy, not caramel.
- At this point, once the heat is on, there's no turning back. Don't go and fold laundry, this demands your attention for the next few minutes.
- As the sugar is boiling you're going to have lots of steam. But it will dissipate once the water evaporates, making it much easier to read the thermometer.
- The temperature you need to remove the pan from the heat is 300°! But you're looking for it to reach about 295° before you have to work fast.
- Once it does hit 295°, drop the coloring and stir it up slowly. You'll notice turn a really nice blue, but don't sit there staring at it because by the time you're done stirring it's probably at 300° and needs to come off.
- At 300°, the sugar is done and it needs to be poured onto the tray. The cooking process needs to be stopped or else the color and texture could be off.
- So when it hits 300°, remove the thermometer and just put it down on the nearby foil, and carefully pour the sugar onto the foil lined sheet tray.
- Everything is done and now you're just waiting for it to harden. I left it for about 2 hours to be safe. Once ready, it's time to have some fun!
To make it how I decorated the cake
- You're looking for long pieces. Remember what the cake top looks like. The longer the pieces, the more omph the presentation is going to have. I tried hitting with a butter knife but it wasn't doing much, but the best way would be by hand.
- So just grab it on the side and push down on the top with your thumb. Try to keep the sheet of candy low so you don't shatter the entire thing in one shot.
- You're going to need a few long pieces and one wide enough piece where the figure can stand on. As long as you got that you're fine.
Cake-engers Assemble
- After all of this, the cake is ready to put together. Make your cake, frost it up with frosting (see notes for tips on buttercream and decorating the cake) and then place the ice candy wherever you want. Have fun! And don't be like me and make crazy pointy edges on the candy because it is rather dangerous.
- ....I guess this is needed..
DISCLAIMER
- I am not responsible for any injuries caused by giving you detailed directions on making a dangerous and potentially lethal cake. Please decorate responsibly and use caution and common sense on how pointy you break your hard candy. And for the love of Odin, don't smash your kids face into the cake.
Notes
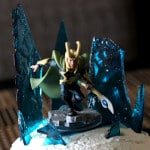
- You're going to need a candy thermometer. And the Loki figure or whatever other ice themed figure you're topping it with.
- This is very similar to the one that I have, so if you need one, this looks like a good one. (This is an affiliate link that I may get compensation for. Thank you!)
- calibrate your thermometer. If you don't, then nothing will work. You calibrate a candy thermometer by putting it in a pot and bringing water to a boil. Water boils at 212°, so check your thermometer when it's boiling and adjust the temperature of your recipe accordingly. For example: If your thermometer is saying the water is boiling at 200°, then subtract 12° from whatever temperature you're supposed to bring your syrup to a boil.
- This recipe is only for the candy. The cake and buttercream can be whatever you want. I've been on a box cake kick the past few years which makes things significantly easier.
- For the buttercream, I did all shortening instead of a shortening/butter combo. This ensured a pure white color that you need for the snow. Plus it's how mama always did it.
- The effect I was looking for when putting the cake together was a supposed to be an icy terrain covered by patches of snow. The cake itself was meant to be a huge piece of ice and the buttercream the snow, with the sugar bringing it all together.
It looked better in my mind. Haha. But still, it was loved by my kid so whatever. The main focus is the figure surrounded by the jagged ice candy, and that's what stands out the most. I would have fixed it to the way I described below, but by the time I finished it was already like 10pm the night before his birthday and didn't feel like making more buttercream. - A huge reason why I wanted to redo the cake for the blog was because I was a fool who didn't remember my basic colors from grade school. I decided to use yellow cake mix that I had in my pantry. So as you could imagine, trying to make a yellow cake turn blue left me with a totally different outcome. Green! (head to wall)
- Another reason is the way the buttercream doesn't cover the whole cake. I went with my original plan, to have patches of snow so the icy looking blue cake can show through. But with having to cut off the outer crust thanks to it being straight up green, it doesn't look too great. Again, it didn't matter, but I have my personal standards that were irking me about it.
- So if you ever try to recreate this, try and aim for the entire cake covered in icing, and random pieces of ice all around. It'll be a much cleaner look and much more presentable.
- The color was pretty easy to reach with just a few drops of blue from the Wilton Color Right System for both the ice and the cake.
- But if you cannot find the color system, gel based food coloring will work just as well.
- While this was made for Loki, it could also work for Elsa. I made one just like this for my daughter with Elsa!
- This could easily be done with any cake recipe or mix. Just... make sure it's not yellow.
